

Health Check
Stanza provides a comprehensive suite of automated tools for checking the initial status of quantum dot devices. We group these tools into a routine called Health Check. Health Check follows a similar workflow to other algorithms that you may be familiar with for quantum devices such as BATIS [1]. The Health Check routine systematically tests and characterizes your device to establish baseline operating parameters such as checking for leaking gates and threshold voltages before running more complex experiments.
Overview
Health Check is the critical first step in quantum dot tuning. Before you can measure charge stability diagrams or manipulate individual quantum dots, you need to:
- Verify that gates are not shorted or leaking
- Determine the global turn-on voltage for the device
- Characterize individual reservoir gates
- Characterize individual finger gates (plungers and barriers)
Stanza’s Health Check routine automates this entire workflow, producing actionable parameters that subsequent tune-up sequences can use.
Quick Start
Configure the Health Check routine in your device YAML file:
Then run the full Health Check sequence:
Voltage Bounds and Carrier Type Conventions
The safe voltage bounds (max_safe_voltage_bound and min_safe_voltage_bound) represent the
extreme voltages that can be safely applied to gates without causing device damage or
unwanted leakage. The interpretation of these bounds depends on the charge carrier type:
For electron-based devices (n-channel, charge_carrier_type=“electron”):
- Accumulation occurs at POSITIVE gate voltages, which attract electrons to form a conductive channel
max_safe_voltage_boundis POSITIVE and represents the maximum safe positive voltagemin_safe_voltage_boundis NEGATIVE and represents the most negative voltage (depletion)- Current INCREASES as gate voltage sweeps from negative (depleted) to positive (accumulated)
For hole-based devices (p-channel, charge_carrier_type=“hole”):
- Accumulation occurs at NEGATIVE gate voltages, which attract holes to form a conductive channel
max_safe_voltage_boundis POSITIVE and represents the most positive voltage (depletion)min_safe_voltage_boundis NEGATIVE and represents the maximum safe negative voltage- Current INCREASES as gate voltage sweeps from positive (depleted) to negative (accumulated)
In both cases, the routines sweep from depletion (low current) toward accumulation (high current), but the voltage polarity is reversed between electron and hole devices. The charge_carrier_type parameter determines which voltage bound is used for accumulation sweeps.
Health Check Routine
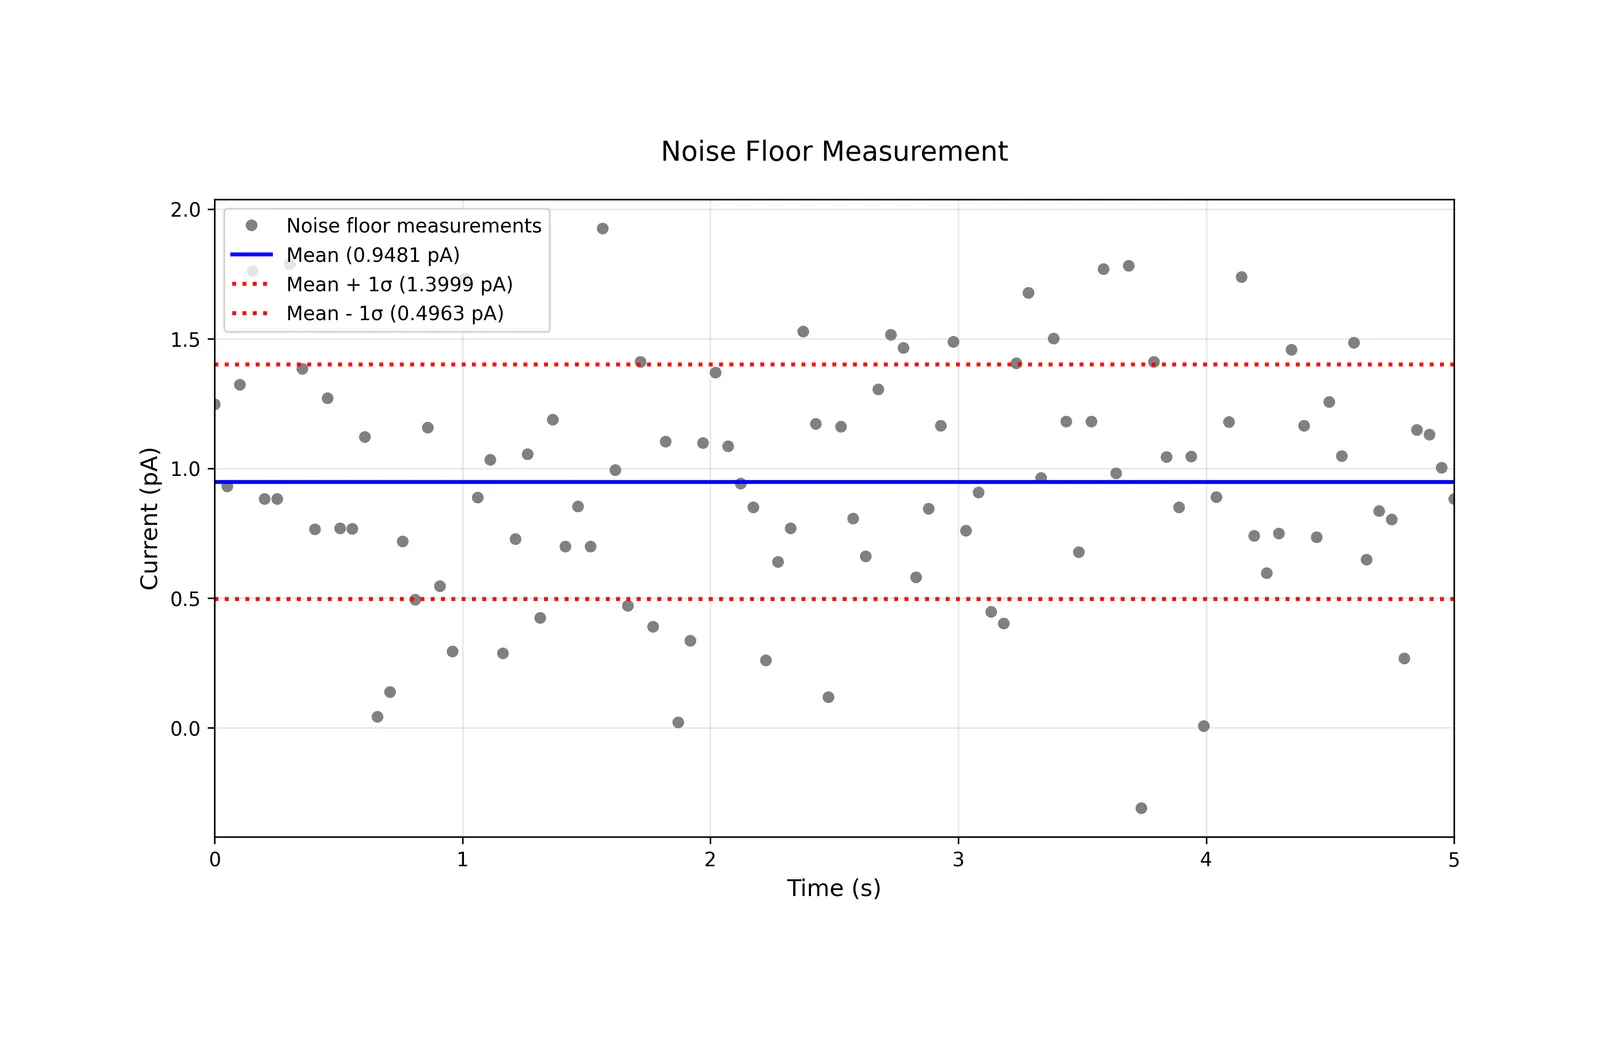
1. Noise Floor Measurement
Purpose: Establish baseline measurement noise and offset to distinguish real signals from noise.
The noise floor measurement performs repeated current measurements on a specified electrode to characterize the statistical properties of measurement noise and offset. The resulting standard deviation is used as a threshold in subsequent routines.
Parameters:
measure_electrode(str): Electrode (or contact) to measure current from (e.g., “DRAIN”)num_points(int, default=100): Number of measurements for statisticssession(LoggerSession, optional): Session for logging measurements
Returns:
current_mean(float): Mean measured current in Amperescurrent_std(float): Standard deviation of current in Amperes
Usage Notes:
- All gates and contacts are automatically set to 0V before measurements using
device.zero(PadType.ALL) - Results automatically logged if session provided
- The
current_stdvalue is typically used inleakage_testasmin_current_threshold
2. Leakage Test
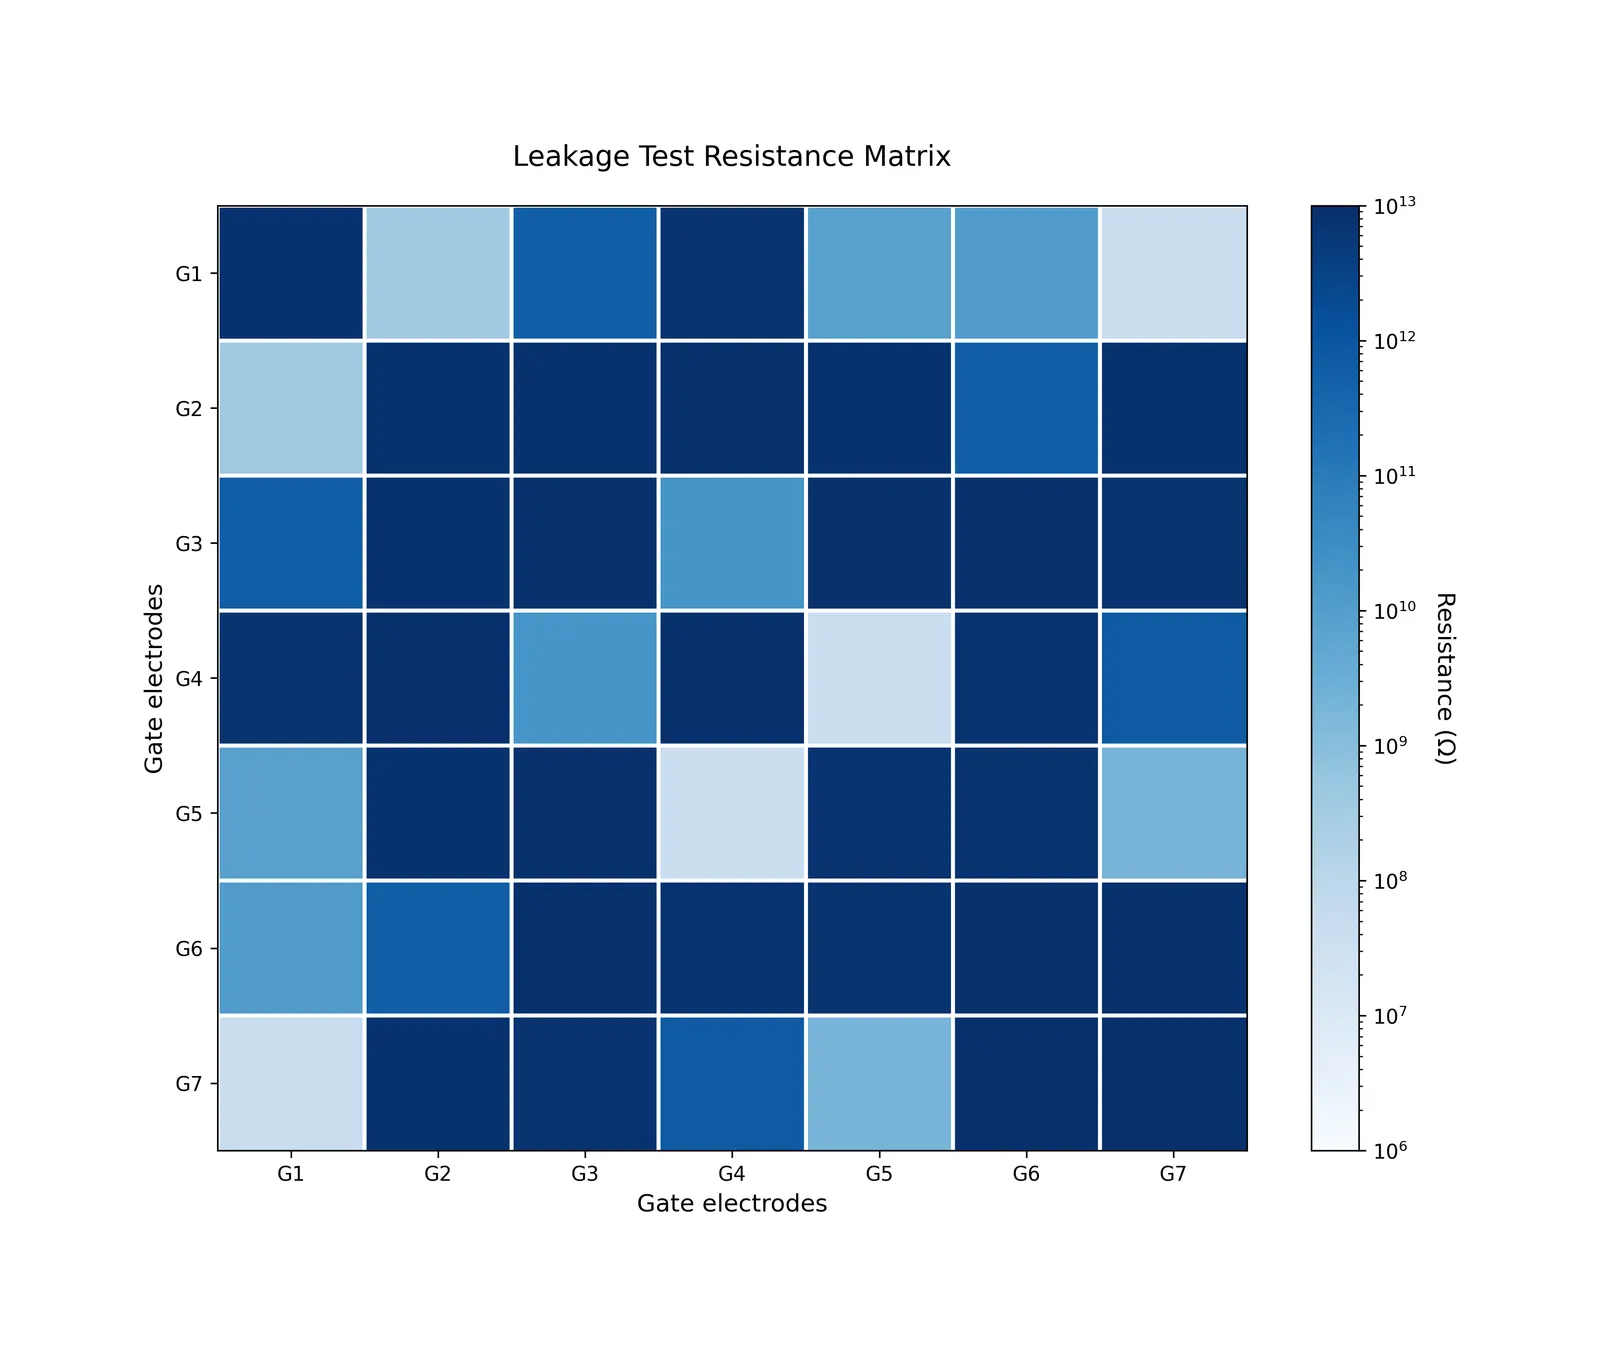
Purpose: Detect unwanted electrical leakage or shorts between gate electrodes and the device’s conductive channel (or substrate), ensuring gate isolation integrity.
The leakage test systematically tests for electrical leakage between all pairs of control gates by sweeping each gate through its voltage range while measuring current on other gates. Leakage is quantified as inter-gate resistance (dV/dI).
Parameters:
leakage_threshold_resistance(int): Maximum acceptable resistance (Ohms) between gate pairs. Lower values indicate more stringent requirements. Typical: 50e6 (50 MOhm)leakage_threshold_count(int, default=0): Maximum number of leaky gate pairs allowed. Default 0 means any leakage causes failurenum_points(int, default=10): Number of voltage steps per directionsession(LoggerSession, optional): Session for logging leakage matrices
Returns:
max_safe_voltage_bound(float): Voltage offset tested for positive boundmin_safe_voltage_bound(float): Voltage offset tested for negative bound
How It Works:
- Sweeps both positive (max_voltage_bound) and negative (min_voltage_bound) directions from initial voltages
- For each gate, measures current response on all other gates
- Calculates resistance matrix: R[i,j] = |ΔV / ΔI|
- Flags gate pairs where resistance <
leakage_threshold_resistance - Device always returned to initial voltages in finally block
Usage Notes:
- Uses
ctx.results.get("current_std")from noise_floor_measurement if available, otherwise defaults to 1e-10 A - Both voltage bounds tested independently regardless of failures
- Current differences below
min_current_thresholdare skipped to avoid noise - Leakage matrix is symmetric; only upper triangle checked
3. Global Accumulation
Purpose: Determine the global turn-on voltage by sweeping all gate voltages simultaneously to induce channel conduction.
This routine sweeps all control gates together from minimum to maximum voltage, identifying the voltage where the device transitions from depletion to accumulation. This establishes a baseline operating point for subsequent characterization.
Parameters:
measure_electrode(str): Electrode to measure current fromstep_size(float): Voltage increment (V) between sweep points. Smaller = higher resolution but longer measurement time. Typical: 0.01 V (10 mV)bias_gate(str): Name of gate to apply bias voltage to during measurementbias_voltage(float): Bias voltage (V) to apply to bias_gatecharge_carrier_type(str): The mobile charge particle type. Must be “electron” or “hole”.session(LoggerSession, optional): Session for logging sweep data
Returns:
global_turn_on_voltage(float): Cut-off voltage (cutoff_voltage) where device turns on, in Volts
How It Works:
- Requires
max_voltage_boundandmin_voltage_boundfrom prior leakage_test - Sweeps all control gates together from depleted to accumulated voltage, depending on the charge carrier type
- Measures current at each voltage step
- Fits data using pinch-off heuristic to extract turn-on voltage (
cutoff_voltage) - Automatically sets all gates to
cutoff_voltageafter analysis
Usage Notes:
step_sizeconverted to num_points based on voltage range- Device automatically set to
cutoff_voltageafter successful analysis - The
cutoff_voltagevalue used by subsequent steps in the Health Check routine - Raises
RoutineErrorif step_size ≤ 0
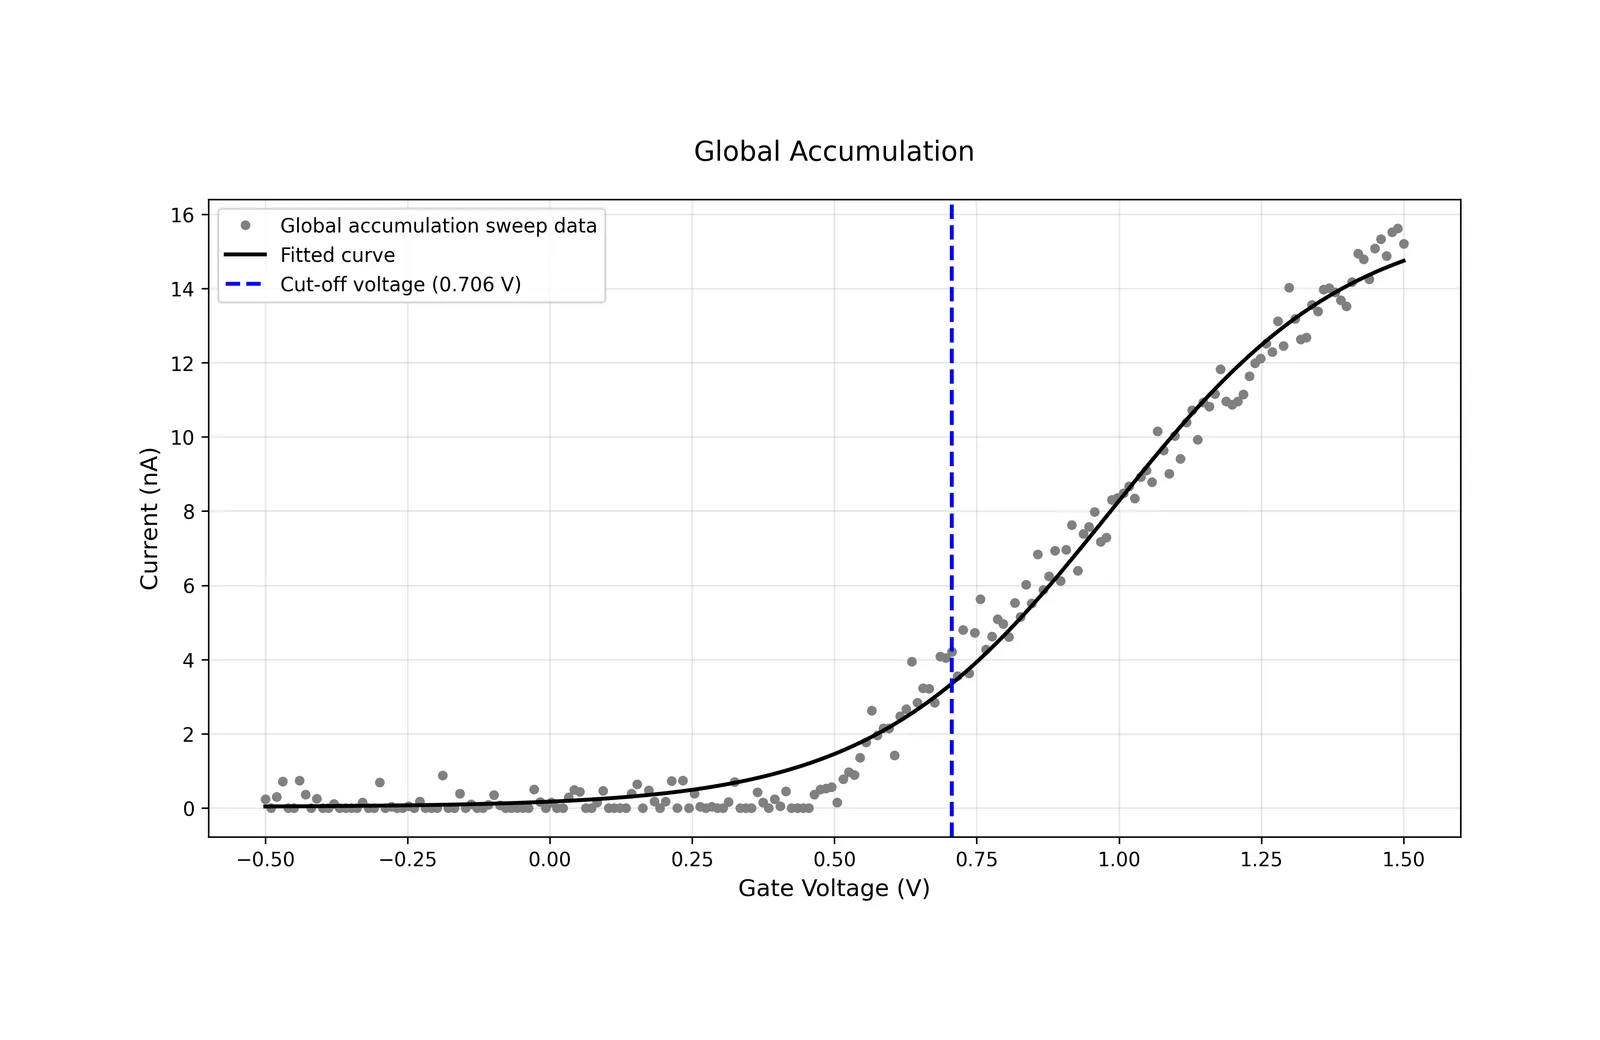
Global accumulation sweep with all control gates swept simultaneously. The hyperbolic tangent fit extracts the global turn-on voltage (cutoff_voltage) from the depletion to accumulation transition.
4. Reservoir Characterization
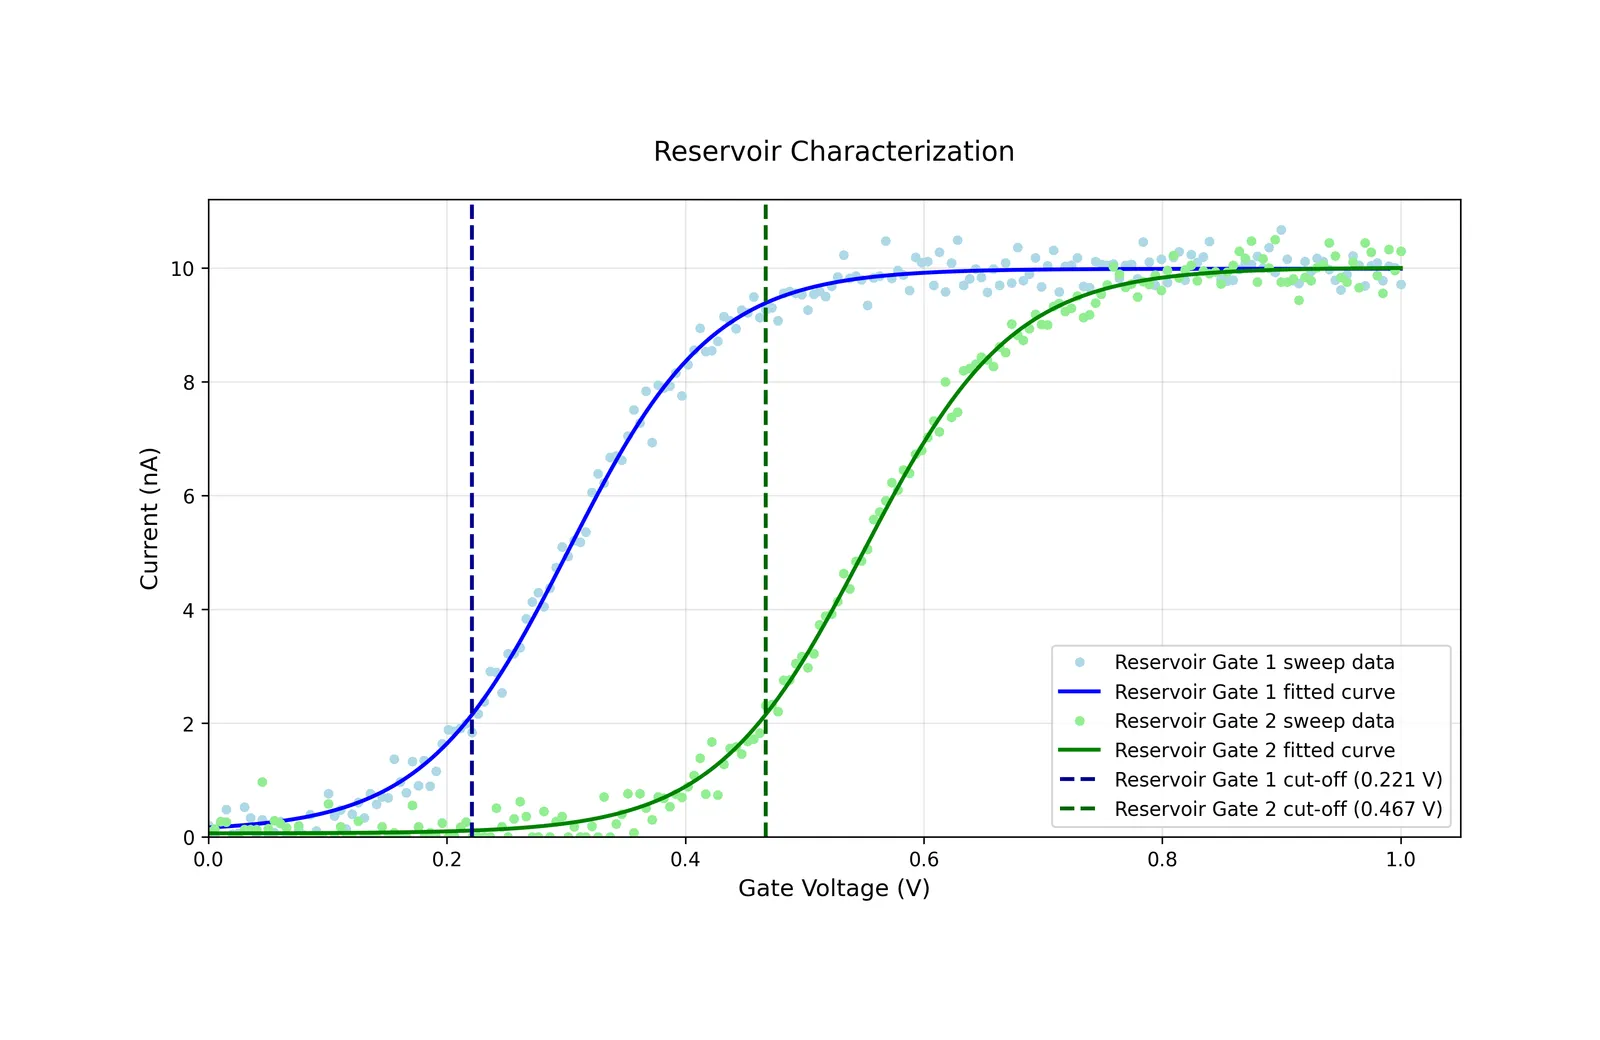
Purpose: Characterize individual reservoir gates to determine their cut-off voltages.
This routine determines the turn-on voltage for each reservoir gate individually by sweeping each reservoir while holding others in accumulation. This isolates each reservoir’s behavior.
Parameters:
measure_electrode(str): Electrode to measure current fromstep_size(float): Voltage increment (V) between sweep points. Typical: 0.01 Vbias_gate(str): Name of gate to apply bias voltage to during measurementbias_voltage(float): Bias voltage (V) to apply to bias_gatecharge_carrier_type(str): The mobile charge particle type. Must be “electron” or “hole”.session(LoggerSession, optional): Session for logging sweep data
Returns:
reservoir_characterization(dict): Maps each reservoir name to its turn-on voltagecutoff_voltagein Volts
How It Works:
- Requires voltage bounds and
global_turn_on_voltagefrom prior routines - For each reservoir:
- Sets other reservoirs to min(1.2 × global_turn_on_voltage, voltage_bound)
- Sets target reservoir to 0 V with 10s settling time
- Sweeps target reservoir from depleted to accumulated voltage, depending on the charge carrier type
- Fits data using pinch-off heuristic to extract
cutoff_voltage
- Tests each reservoir sequentially
Usage Notes:
- Each reservoir tested sequentially (not parallel)
- 10 second settling time between voltage changes
- Other reservoirs are set to 120% of the global turn-on voltage to ensure full conduction
- May raise
ValueErrorif curve fit fails
5. Finger Gate Characterization
Purpose: Characterize individual finger gates (plungers and barriers) to determine their cut-off voltages.
This routine determines the cut-off voltage for each finger gate (plungers and barriers) individually by sweeping each gate while holding others in accumulation.
Parameters:
measure_electrode(str): Electrode to measure current fromstep_size(float): Voltage increment (V) between sweep points. Typical: 0.01 Vbias_gate(str): Name of gate to apply bias voltage to during measurementbias_voltage(float): Bias voltage (V) to apply to bias_gatecharge_carrier_type(str): The mobile charge particle type. Must be “electron” or “hole”.session(LoggerSession, optional): Session for logging sweep data
Returns:
finger_gate_characterization(dict): Maps each finger gate name to its cut-off voltage in Volts
How It Works:
- Requires voltage bounds and
global_turn_on_voltagefrom prior routines - For each finger gate (plunger or barrier):
- Sets other finger gates to min(1.2 × global_turn_on_voltage, voltage_bound)
- Sets target gate to the left voltage bound with 10s settling time
- Sweeps target gate from depleted to accumulated voltage, depending on the charge carrier type
- Fits data using pinch-off heuristic to extract
cutoff_voltage
- Tests each gate sequentially
Usage Notes:
- Processes both PLUNGER and BARRIER gate types
- Each gate tested sequentially (not parallel)
- 10 second settling time after setting target gate to 0 V
- Other gates biased at 120% of global turn-on
- May raise
ValueErrorif curve fit fails
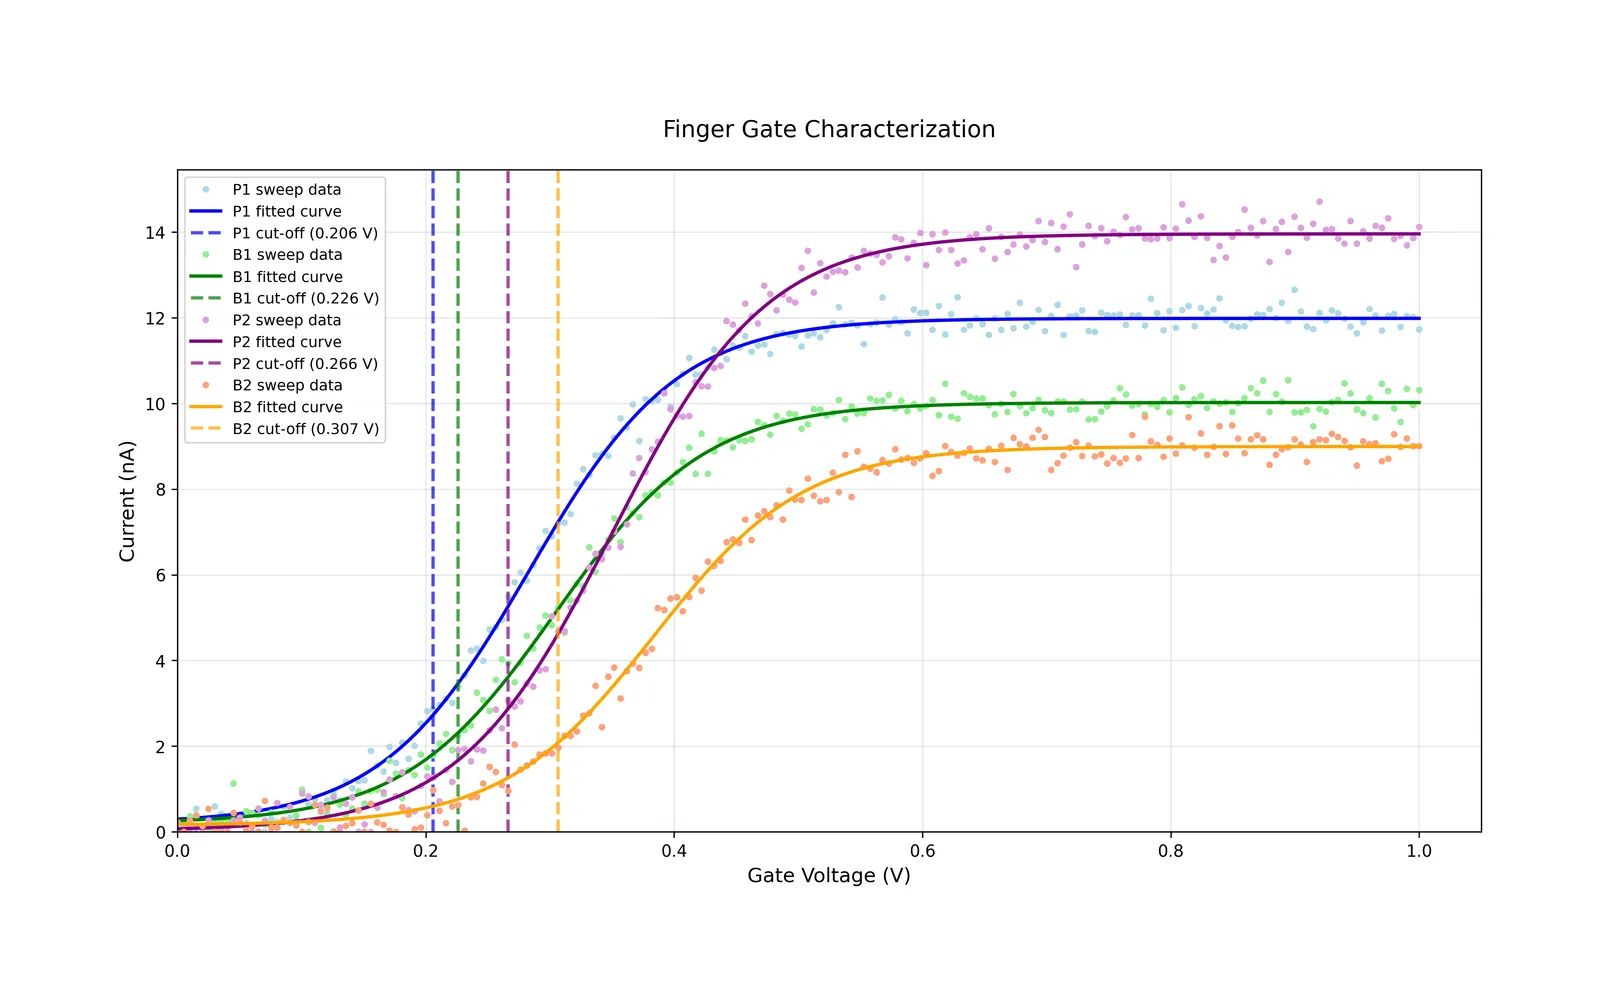
Pinch-off Analysis
All gate characterizations in the Health Check routine uses a pinch-off curve fitting approach to extract turn-on voltages. The fitting uses a smooth hyperbolic tangent model:
Where:
a: Amplitude parameterb: Slope parameterc: Offset parameter
The analysis extracts three characteristic voltages from derivative extrema:
- v_cut_off (cut-off): Where device approaches near-zero current (minimum of second derivative)
- v_transition (transition): Midpoint of transition from cut-off to saturation (maximum of first derivative)
- v_saturation (saturation): Where device approaches saturated current (maximum of second derivative)
The Health Check routine returns the pinch-off analysis characteristics [2].
Configuration Guide
Device Configuration
The Health Check routine requires proper gate type annotations in your device config:
Routine Parameters
Key parameters to tune for your device:
Leakage Test:
Sweep Step Size:
Trade-offs:
- Smaller step_size: Better voltage resolution, longer measurement time
- Larger step_size: Faster measurement, may miss narrow features
- More num_points: Better leakage detection, longer test time
Nested Routine Execution
Stanza supports nested routines for organizing complex workflows:
Execute the entire tree with:
Or run individual routines:
Stanza Improvements
Stanza’s Health Check routine follows a similar workflow to the BATIS framework [1], with several key improvements:
1. Configuration-First Design
- All parameters defined in YAML configuration files
- Benefit: Change characterization parameters without modifying code. Easier collaboration and version control.
2. Modular Architecture
- Decorator-based routines that work standalone or in sequences
- Benefit: Use individual characterization routines independently. Mix and match with custom routines.
3. Extensible Framework
- Driver abstraction layer supporting multiple instrument backends (QDAC2, OPX+, custom)
- Benefit: Same Health Check code works across different hardware platforms.
4. Automatic Data Logging
- Built-in session-based logging to HDF5/JSONL with automatic metadata
- Benefit: All measurements and analysis results automatically saved with timestamps and parameters.
5. Result Chaining
- Automatic result registry (ctx.results) passes data between routines
- Benefit: Downstream routines automatically access upstream results. No manual plumbing.
6. Type Safety
- Pydantic models with compile-time type checking
- Benefit: Catch configuration errors before running experiments. Better IDE support.
Example: Stanza
Advanced Usage
Custom Analysis Functions
You can write custom routines that use Health Check results:
Add to your config:
Error Handling
The Health Check routine raises RoutineError for configuration issues and ValueError for fit failures:
Common failure modes:
- Curve fit failure: Data too noisy or doesn’t follow cut-off model. Try adjusting step_size or check device connectivity.
- Leakage test failure: Inter-gate resistance below threshold. Check for shorts or reduce threshold.
- Missing results: Routine depends on previous routine results. Ensure routines run in correct order.
Session Logging
All components of the Health Check routine support optional session logging:
Each routine session contains:
- Measurements: Raw sweep data (voltages, currents, leakage matrices)
- Analysis: Fit parameters, turn-on voltages, statistics
- Metadata: Timestamps, device config, routine parameters
Best Practices
1. Always Run Noise Floor First
The noise floor measurement provides the current threshold for leakage testing:
2. Check Leakage Before Health Check
Running gate characterization on a leaky device can damage gates. Always verify leakage test passes before proceeding:
3. Use Appropriate Step Sizes
Balance resolution vs measurement time:
- Coarse sweep (50-100 mV): Initial device testing, fast sanity checks
- Medium sweep (10-20 mV): Standard Health Check, good balance
- Fine sweep (1-5 mV): High-resolution Health Check, detailed features
4. Monitor Fit Quality
Check covariance matrices for poor fits:
5. Save Configuration with Data
Always version control your device YAML alongside data:
Troubleshooting
Curve Fit Failures
Symptom: ValueError: Curve fit covariance matrix indicates poor fit
Causes:
- Data too noisy
- Device not responding to voltage sweeps
- Insufficient voltage range
- Wrong measure electrode
Solutions:
- Check device connectivity and grounding
- Verify measure_electrode in config matches physical setup
- Increase voltage range (v_lower_bound, v_upper_bound)
- Reduce step_size for better resolution
- Check for instrument calibration issues
Leakage Test Failures
Symptom: Leakage test failed: Found N leaky connections
Causes:
- Actual gate shorts or crosstalk
- Threshold too stringent
- Measurement noise mistaken for leakage
Solutions:
- Check for physical shorts on device
- Increase
leakage_threshold_resistanceif device has known crosstalk - Set
leakage_threshold_count > 0to allow some leakage - Verify cable connections and shielding
Missing Results
Symptom: KeyError: 'global_turn_on_voltage' or similar
Causes:
- Routines run out of order
- Previous routine failed without raising exception
Solutions:
- Use nested routine structure to enforce ordering
- Check that all prerequisite routines completed successfully
- Use
runner.run_all()instead of individualrun()calls
References
[1] Kovach, T. et al. BATIS: Bootstrapping, Autonomous Testing, and Initialization System for Si/SiGe Multi-quantum Dot Devices. arXiv:2412.07676 (2024).
[2] Darulová, J. et al. Autonomous tuning and charge state detection of gate defined quantum dots. Physical Review Applied 13, 054005 (2020).